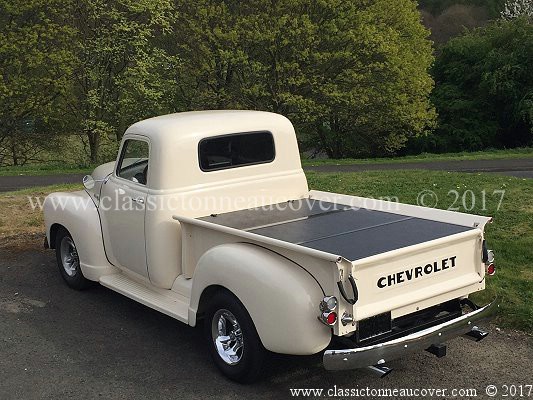
Introduction -
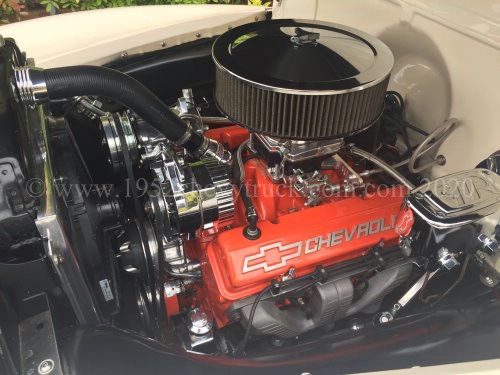
The engine at the beginning of 2020 and for many years has looked pretty good but there is room for improvement.
Since 2007 there have been a number of upgrades which have contributed to engine dress-up and with this truck the
starting point has to be a clean firewall and alternative routing of pipes and wiring. The engine dress-up has been
a gradual process over the years culminating in this big upgrade from Feb.2020 to July 2020 detailed below
In chronological order, the earlier stages, 2007 - 2019 were -
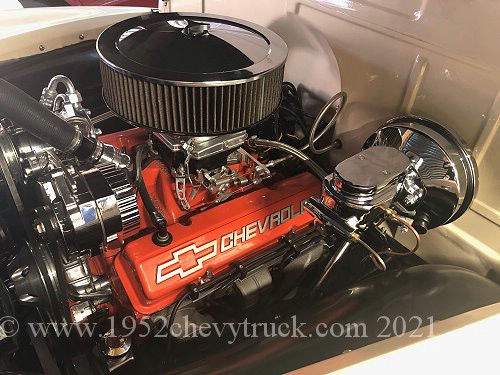
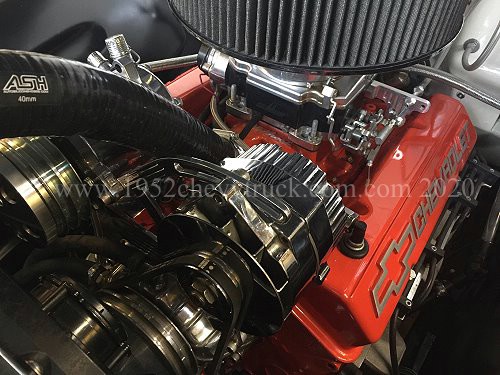
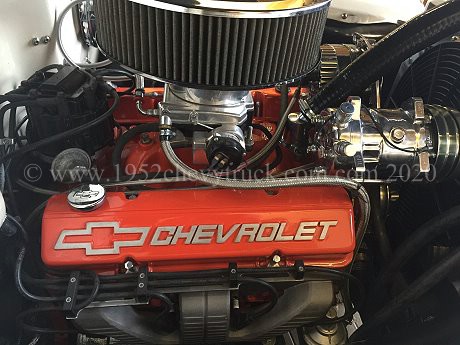
• Nov. 2007. GM Performance rocker covers, Summit racing chrome alternator and air filter, electric fan.
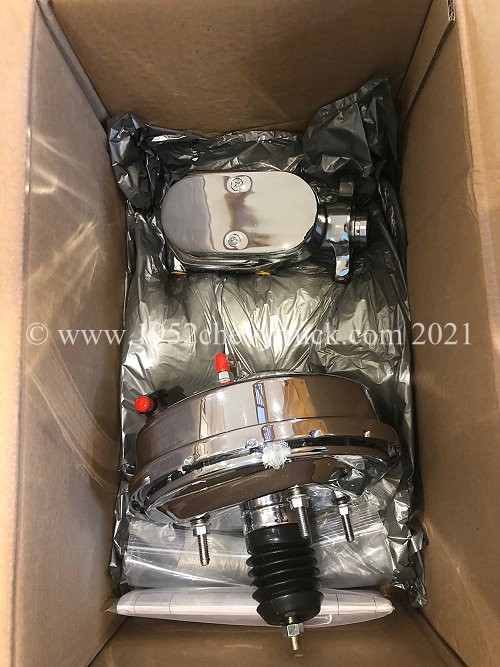
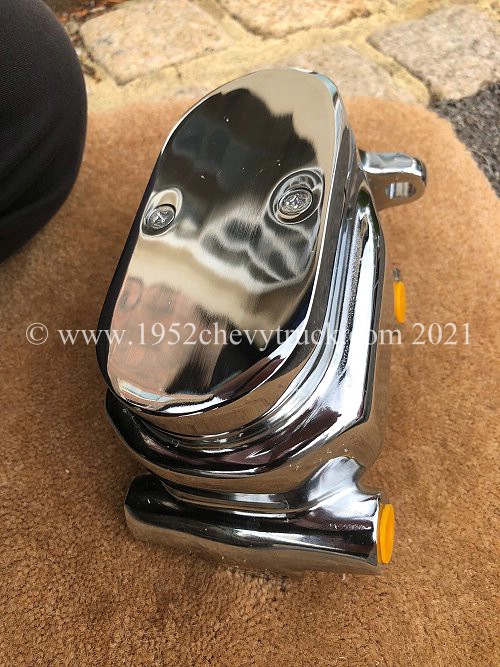
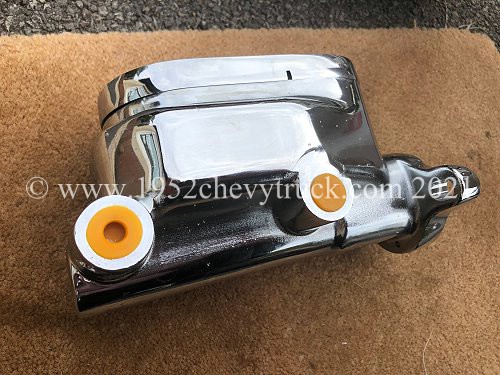
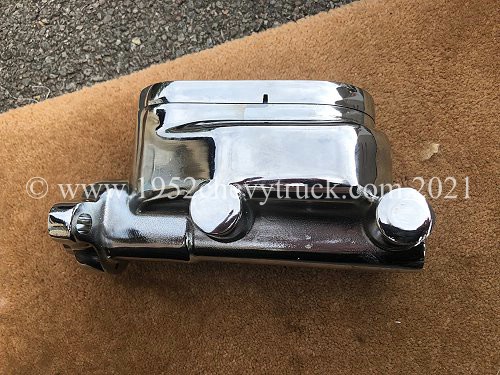
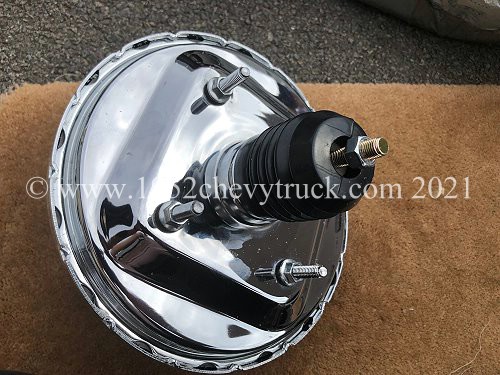
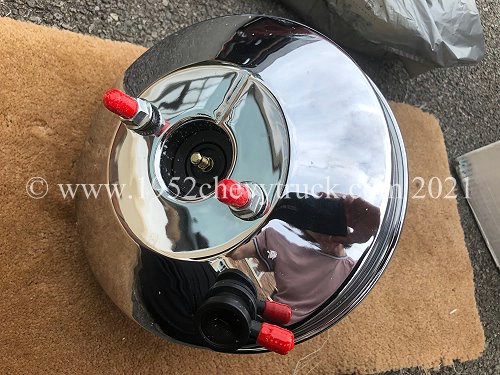
• 2008. Pedal box and chrome master cylinder and brake booster fitted to firewall.
• Sept. 2009. 1st front end strip down. This web page shows how a clean firewall was produced.
• March 2011. 2nd front end strip down. Moving the air conditioning "dryer" from the firewall to forward of the radiator.
• March 2011. 2nd front end strip down. Routing the air conditioning and heater pipes through the right hand fender.
• June 2015. Edelbrock inlet manifold, Street Demon carb, Sanderson manifolds, R and M Specialities HT leads bracket fitted.
• June 2015. Polished aluminium finned water pump fitted.
• April 2017. The windscreen washers are hidden under the fenders.
• Feb 2019. 3rd front end strip down. Re-painting the engine "Chevy Orange".
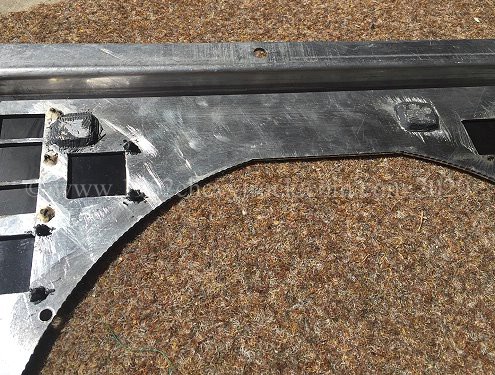
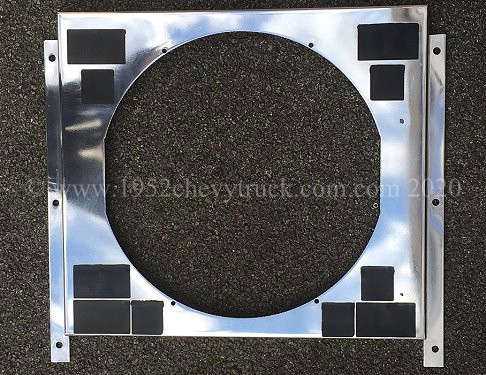
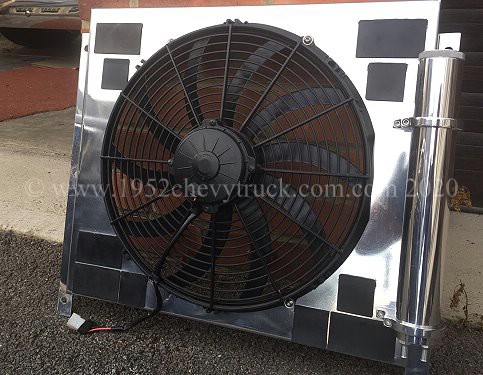
• March 2019. Polished aluminium radiator shroud fitted.
(Pictures of the engine when the truck was purchased in June 2007 are lower down the page after this series of upgrades.)
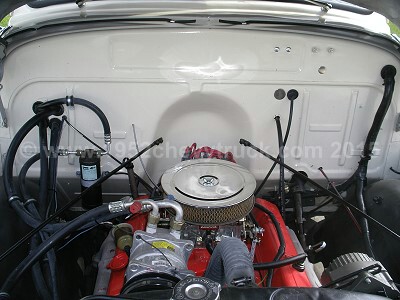
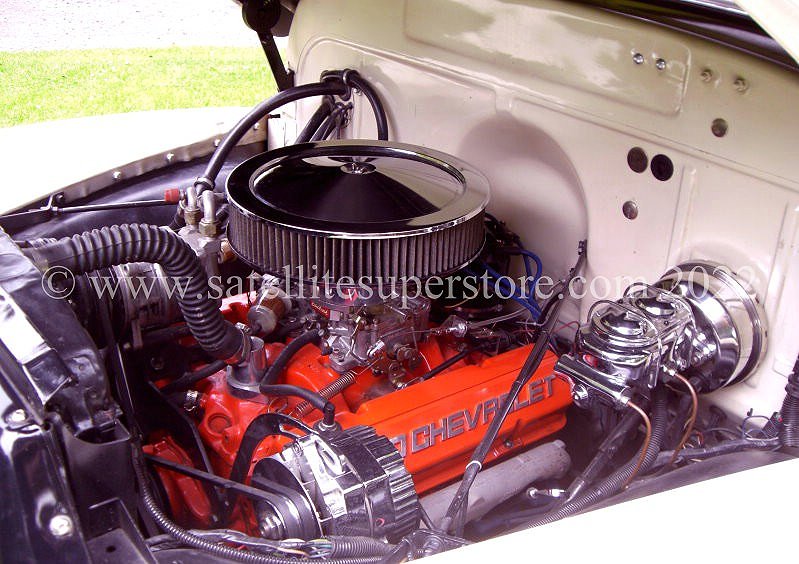
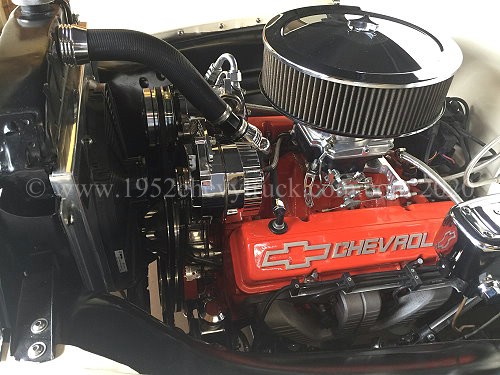
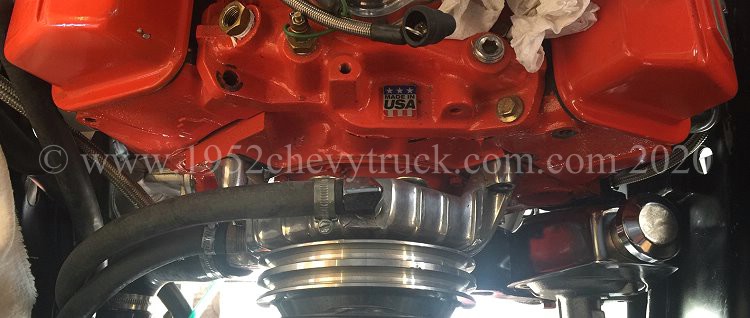
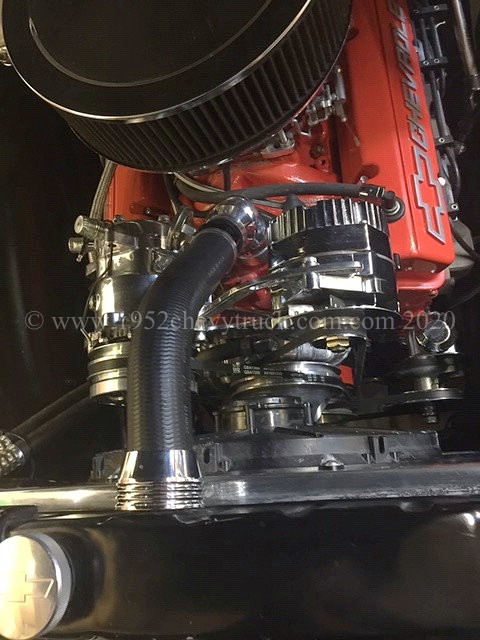
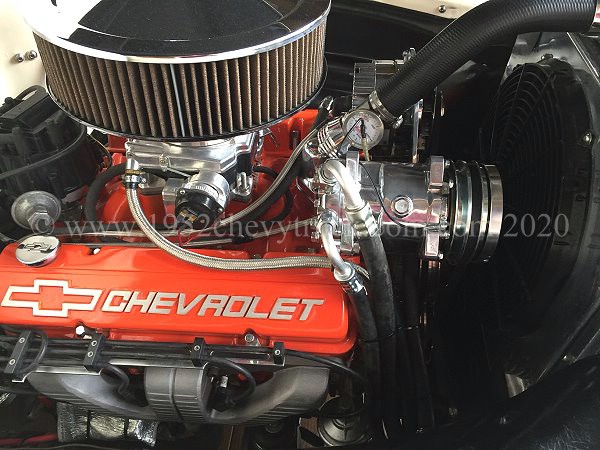
The engine in Jan. 2020 before these 2020 engine dress-up modifications

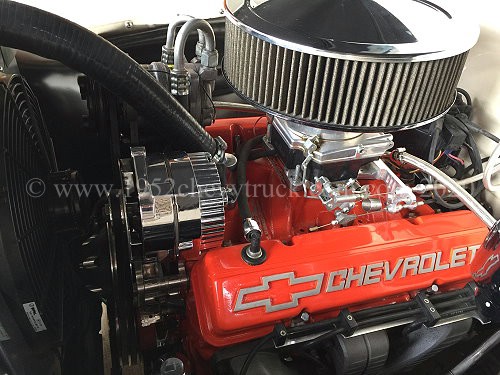
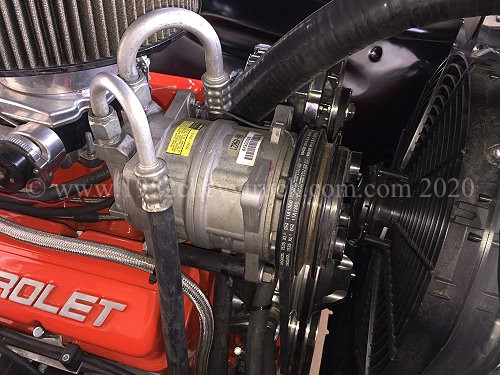
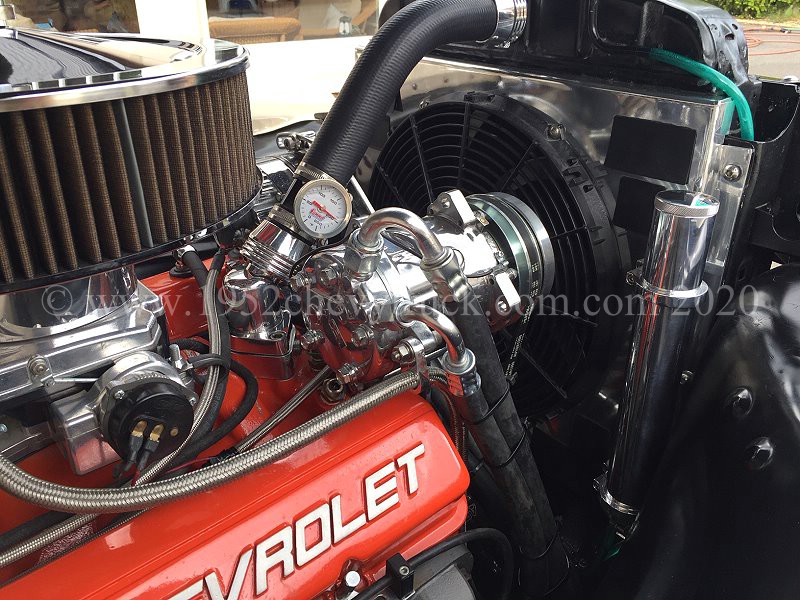
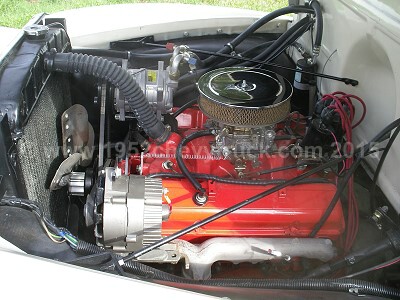
At the front of the engine there is a compressor and an alternator. The compressor was already fitted to the truck when
I purchased it in 2007. The original alternator was changed to a 140A “Summit Racing” chrome alternator in 2007 ($99).
The 2020 engine dress up upgrades-
March to July 2020
Stripping down the front end.
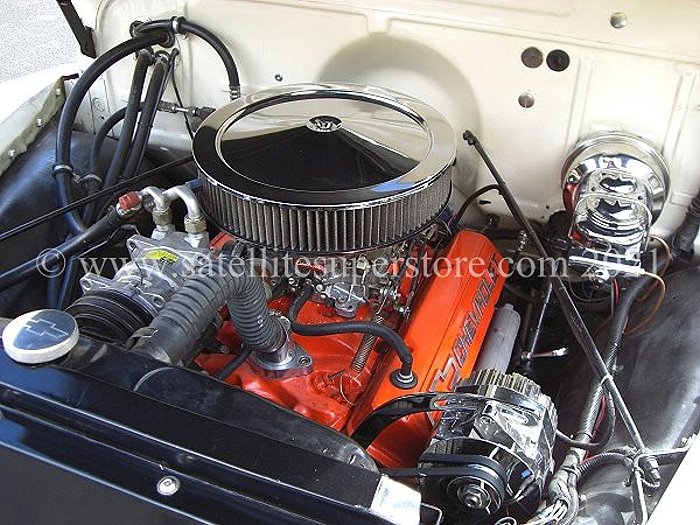
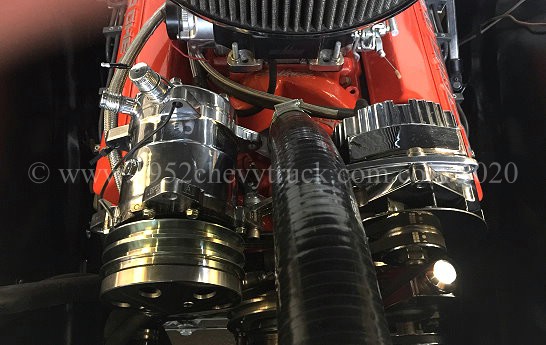
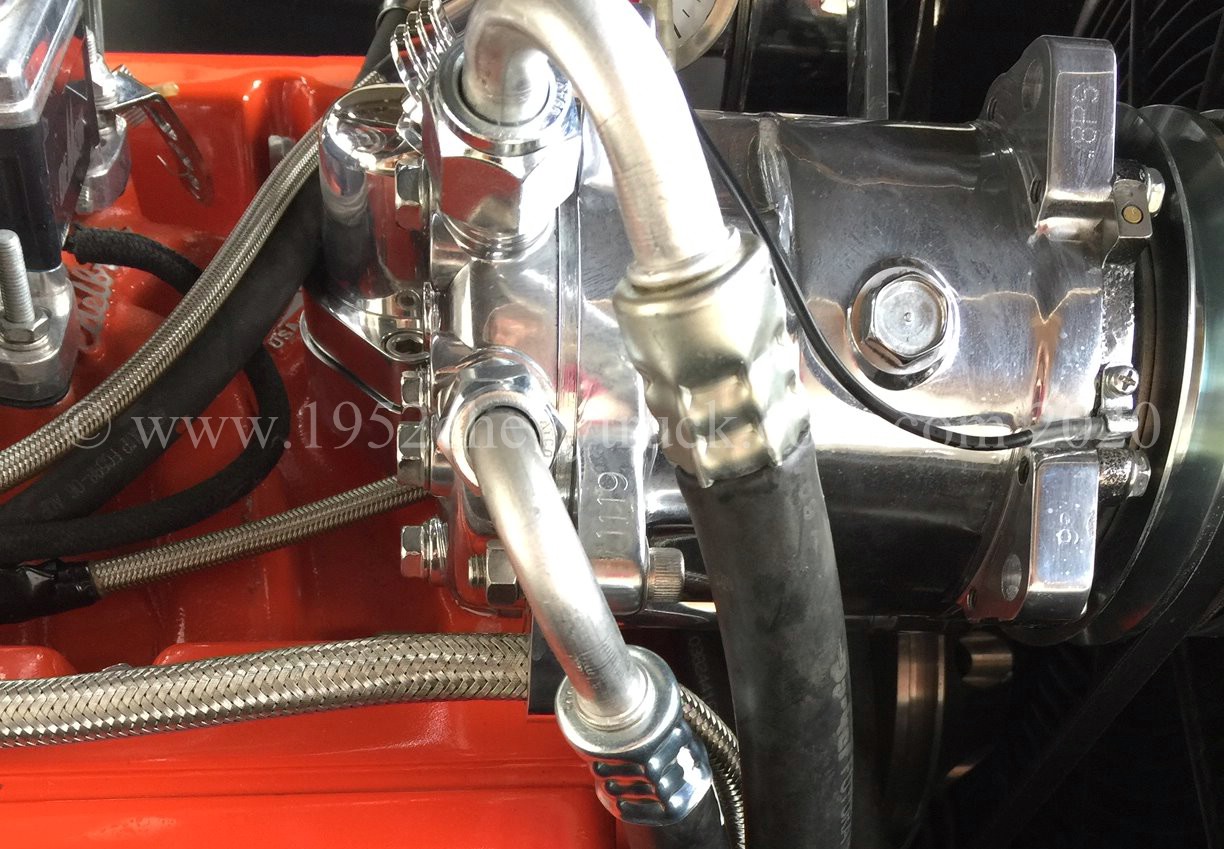
The new chrome compressor.
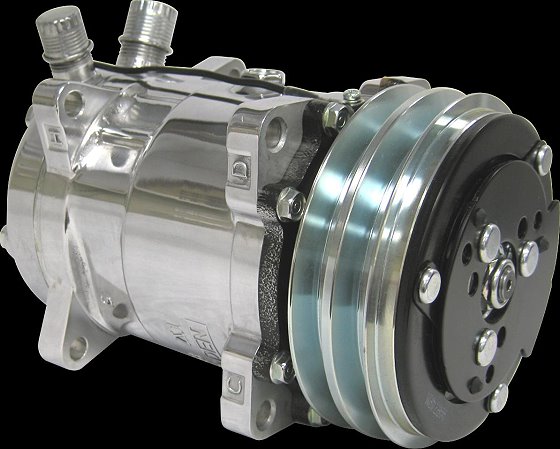
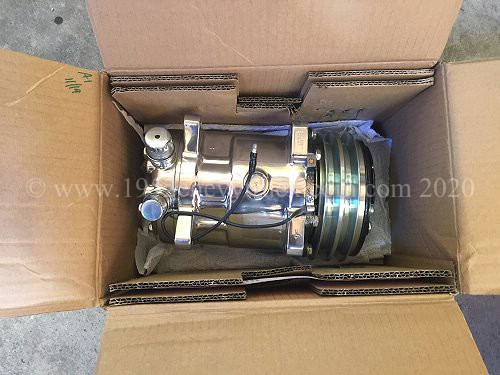
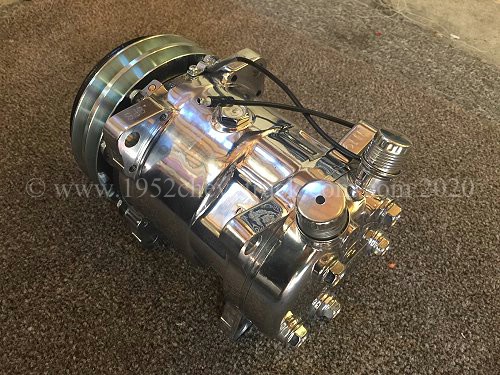
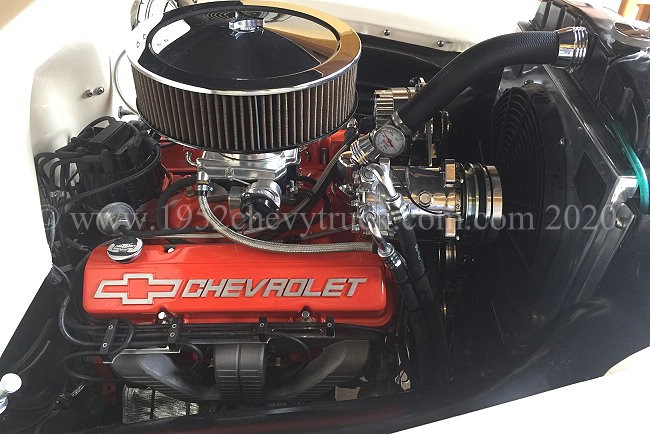
Now in 2020 it is time to make improvements. It was always planned to eventually replace the compressor with a chrome
compressor and so in late 2019 this option was researched. The Vintage Air “04808-VUQ” (Summit Racing $260) was
chosen and ordered from Summit Racing in March 2020.
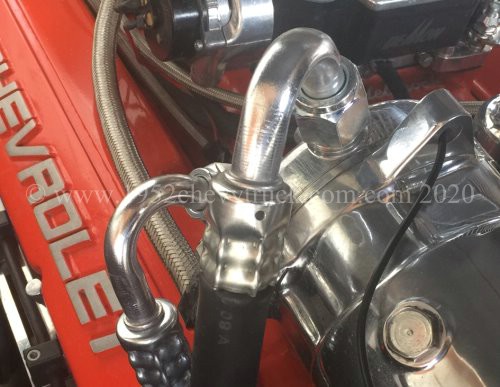
The compressor clutch pulley cover
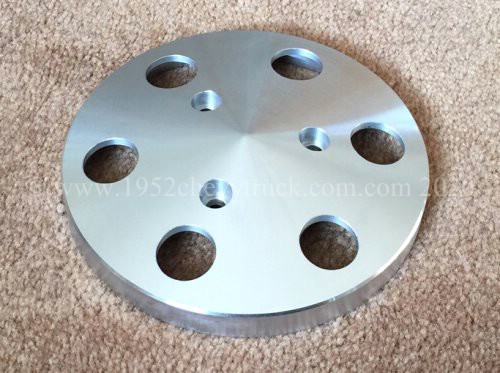
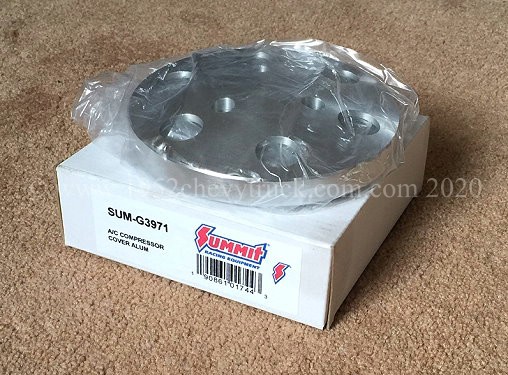
There is a wide choice of clutch pulley covers for the Sanden 508 type compressors. This one is polished
aluminium and came from Summit Racing, part number SUM-G3971 and cost $27.99.
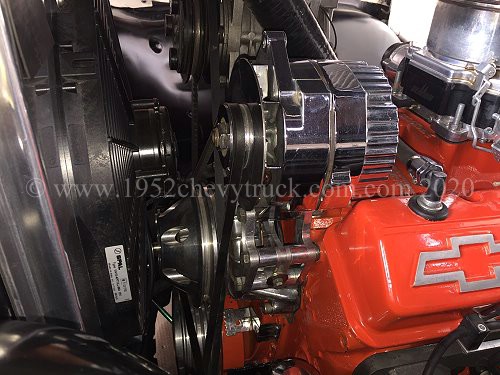
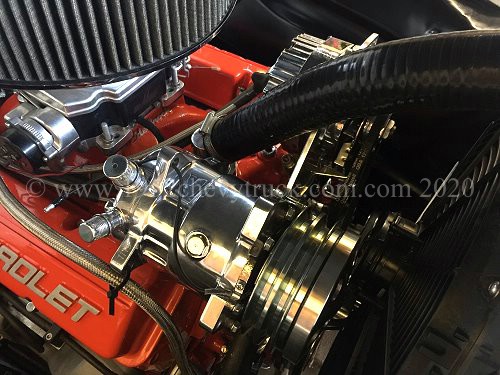
The very important compressor/ alternator mounting bracket
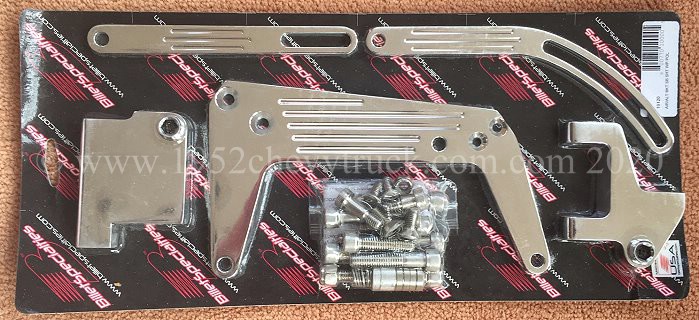
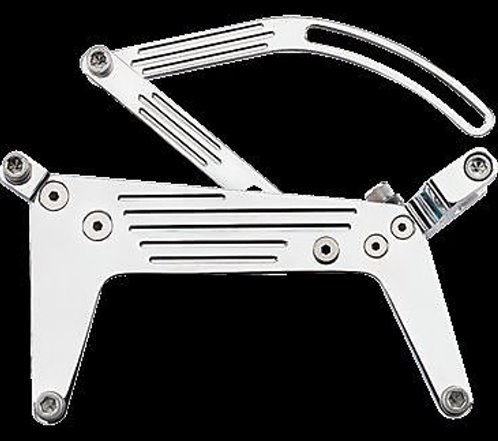
Finding the correct mounting bracket was the key to this upgrade and based on a recommendation -
the "Billet Specialities 10120" was chosen.
This large polished aluminium bracket holds the compressor and the alternator.
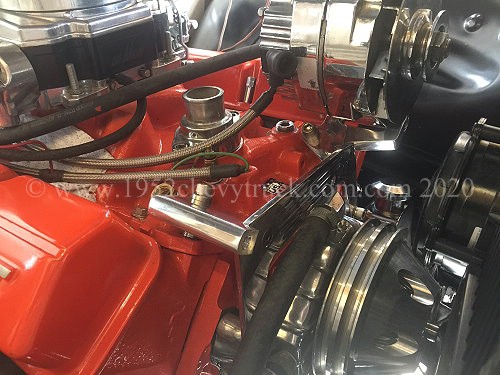
This bracket has a number of very important advantages over any other bracket(s) available.
Note, most if not all other brackets are separate brackets on each side of the engine.
1. Looks fantastic. Polished aluminium.
2. Very important - more rigid than any other bracket. The problem with the Gen 1 Small Block is that there
are only 2 bolts holes for the alternator bracket to hold the alternator rather than 3 on later engines. That
means it is not held as rigidly as it should be. When you have a on-piece bracket like the Billet 10120 here,
which holds both the alternator and the compressor and uses multiple mounting bolts on both sides of the
engine, (including sharing a water pump mounting bolt) everything is very rigid. This sorts out the
problem of a slightly flexible alternator when held by only 2 bolts.
3. The alternator and compressor are both at the same height and position. Symmetrical mounting.
4. The alternator has a large amount of adjustment both sideways and vertically. This makes it easy to mount with
the correct clearance from the rocker cover but also plenty of adjustment to achieve the correct belt tension.
Assembly
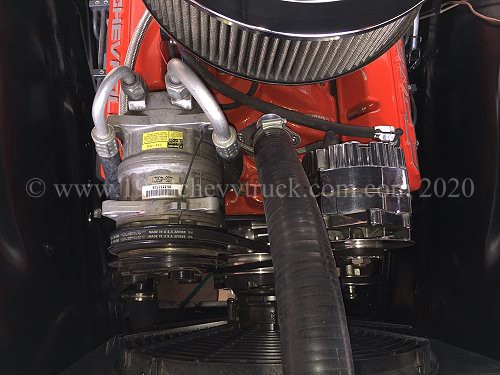
Due to the new compressor input and output pipes being at a different angle, the pipes now need new ends
on so that they can be connected to the compressor. The old 180 degree fittings would no longer fit and
135/120 degree fittings were ordered. One is a 10AN fitting and the other is an 8AN fitting.
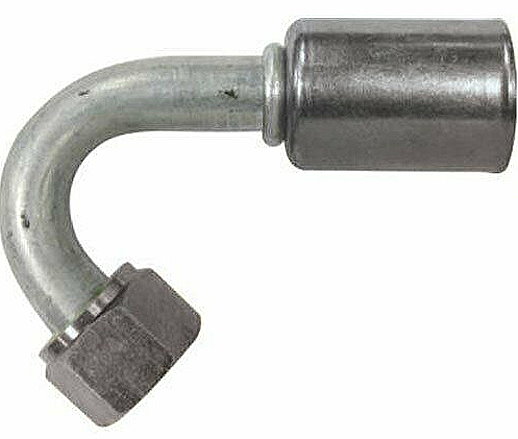
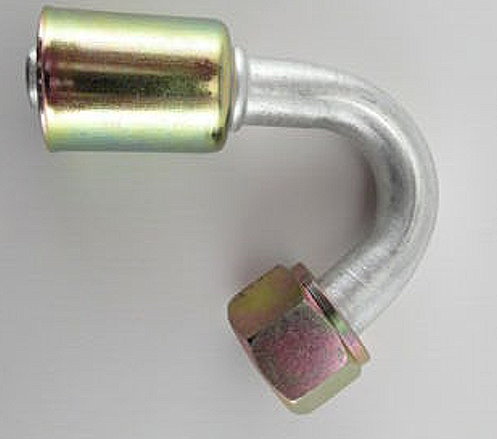
The 135 degree 8AN fitting (above left) came from "JEGS" via ebay at $11.49 part number ("Vintage Air") 35842-VUG
The 120 degree 10AN fitting (above right) came from "acpartsguys" via ebay at $17.95
The Sanden compressor has 2 ports -
The 10AN female O-ring Beadlock fitting is for the low suction port
The 8AN female O-ring Beadlock fitting is for the high suction port
The 10AN (5/8") fitting with 7/8-14 thread size is for #10 1/2" ID and 1" OD barrier hose.
The 8AN (1/2") fitting with 3/4-16 thread size is for #8 13/32" ID and 29/32" OD barrier hose.
Ordering problems
Unfortunately this is when a problem arose trying to buy one of these 10120 brackets. I ordered it from JEGS and a
few days later was told it was discontinued. Checked Summit and Speedway. Discontinued. Rang Billet and was told
discontinued. Reason? “Not very popular as not that many people have the earlier V8 any more”. Summit had them
in stock in January 2020. Billet told me it was actually discontinued at the beginning of 2019 but stocks lasted until
the end of 2019. After some research I found one (new) still available on eBay.com (and with international shipping).
In March 2020 and ordered it. I ended up paying more ($225) but at least I have now obtained one.
Conclusions
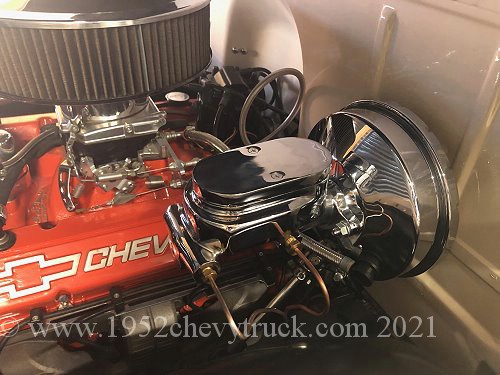
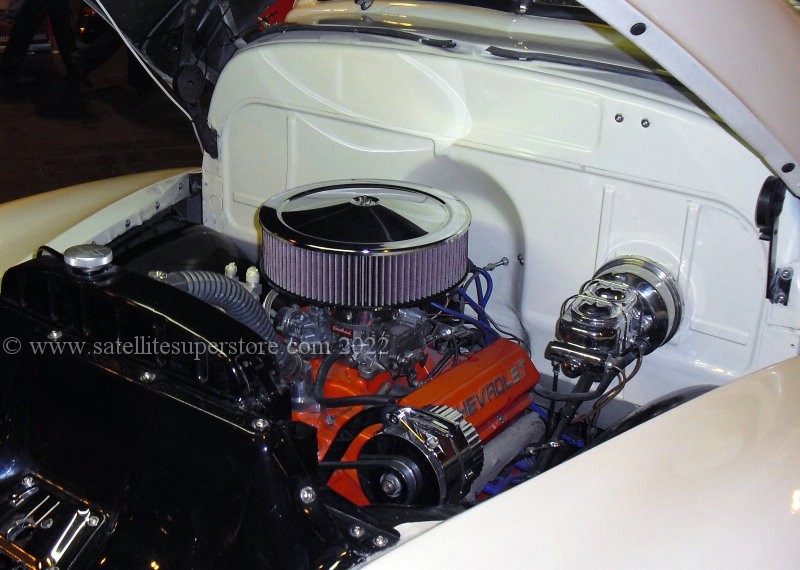
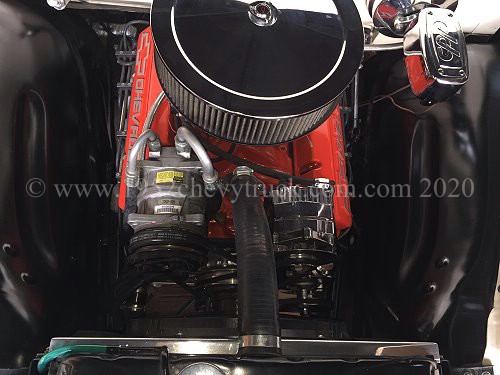
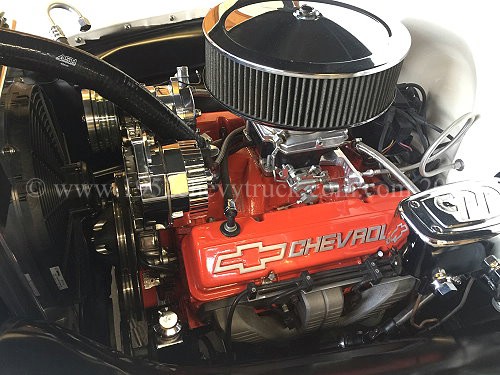
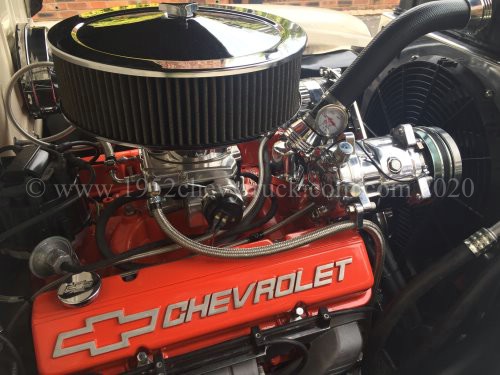
When the hood is lifted the first thing you see behind the radiator is the alternator, compressor and bracket.
This new polished aluminium bracket kit looks amazing and everything is polished and symmetrical.
Of course you can get a similar appearance with a “Serpentine system” (if you have room for one) but
here you can see it is possible to achieve a similar great appearance without that amount of expense.
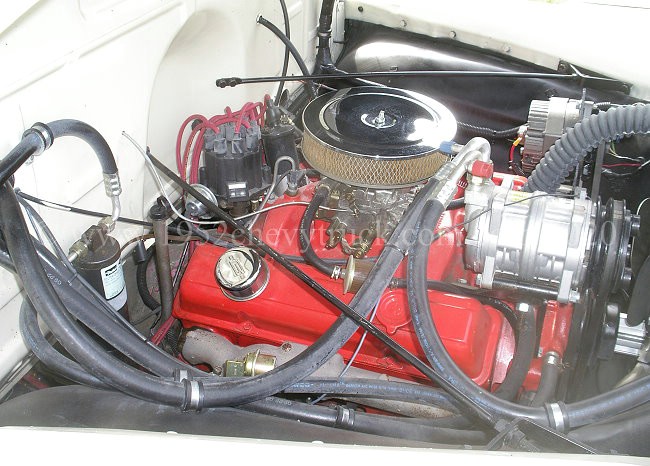
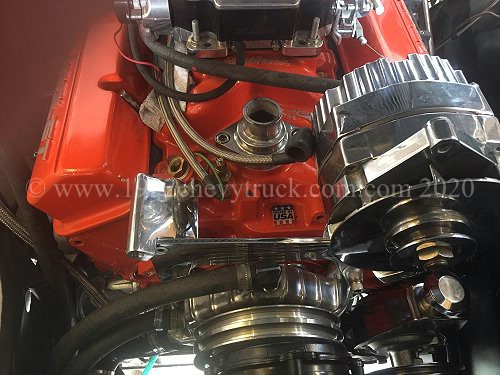
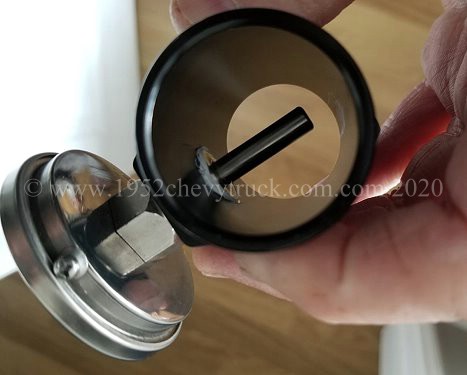
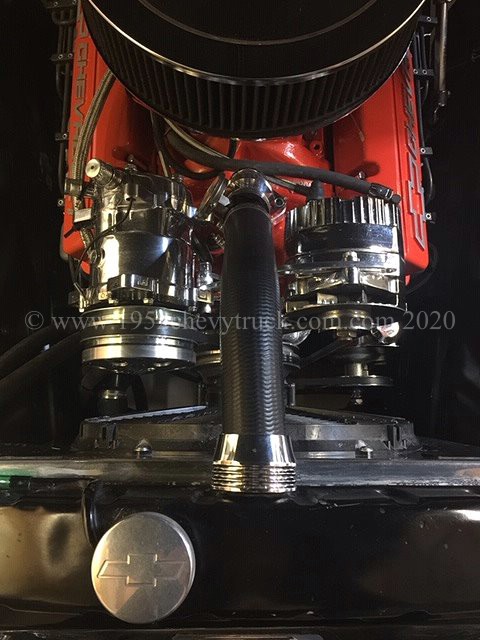
Direct temperature gauge clearance problem
At the start of this update, there was a direct water filled temperature gauge in one of the sensor connector ports
in the inlet manifold. There are three connections possible, one is close to the alternator, one is close to the
compressor and one is in-between. The one in-between has the main temperature sensor fitted for the cab gauge.
Unfortunately the new position of the compressor and compressor bracket does not allow enough clearance to
mount the direct temperature gauge into any of these three ports.
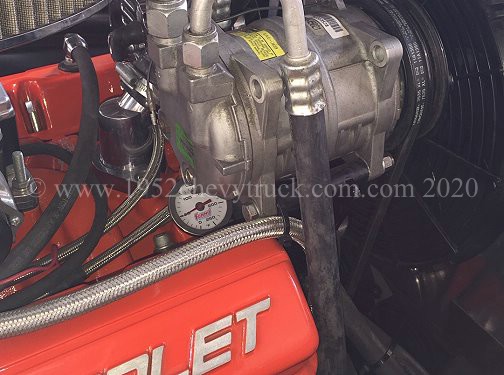
Since the direct gauge was a very useful tool for accurately checking engine temperatures. The only option is to mount
it in the top hose using a hose adapter. Engine temperatures should be between 160f and 200f or 210f Max. Any more
than that and it could start boiling up. Using a summer thermostat the fan comes on at about 160f and so the
temperatures are properly controlled. For peace of mind it is good to see that confirmed on the gauge.
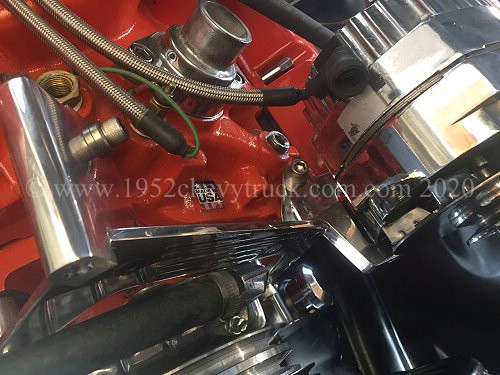
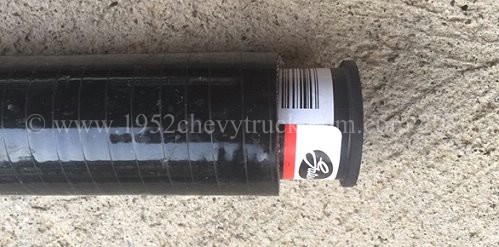
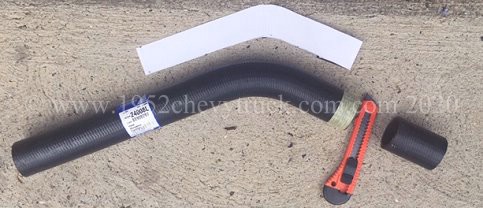
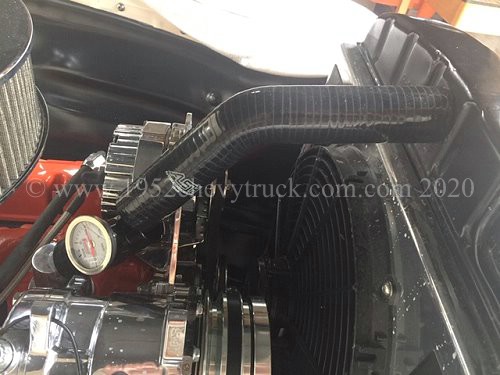
May 2020. Building the (perfect?) radiator top hose.
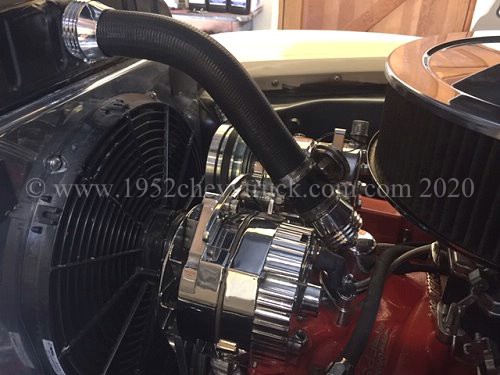
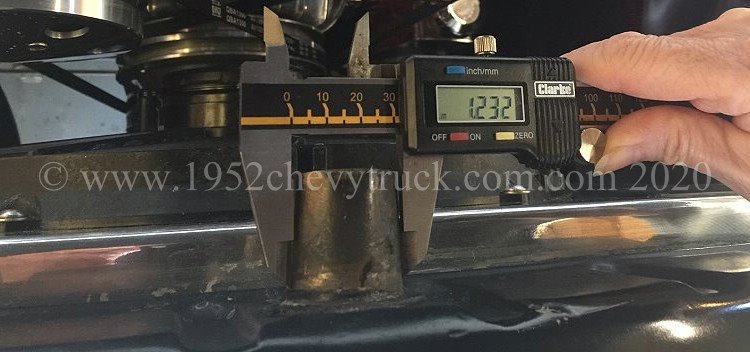
Going from a Gen 1 SBC V8 to an original 52 truck radiator means the hose must start 1,1/2” at the water neck and
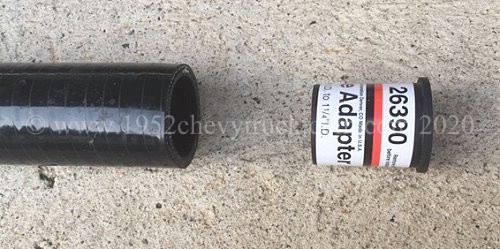
finish 1,1/4” (see below 1.25") at the radiator. Whilst reducer hoses are available, a uniform 38mm hose looks best and the
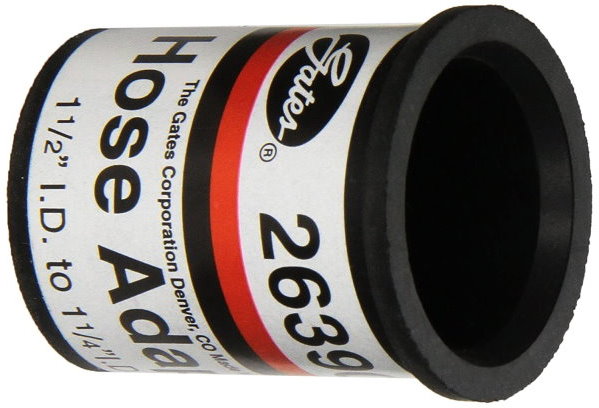
“Gates 26390” Hose Reducer, 1,1/2 to 1,1/4 rubber shim works great. (See below, the sticker round the adapter was removed.)
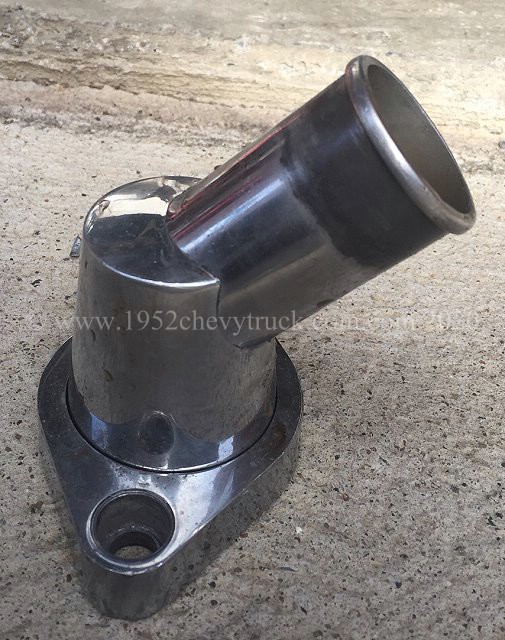
There are a number of 45 degree water necks on the market but most are cast and made in China. The “Billet Specialities”
(BS) 90420, 45 degree water neck swivel is made in the USA from billet aluminium. All BS products are highly polished.
They are more expensive but worth it. It also comes with an excellent o ring to seal against the inlet manifold.
Below left, a cast aluminium waterneck made in China. Below right, a highly polished billet aluminium waterneck made in the USA.
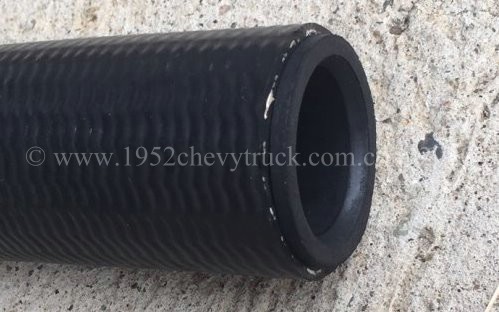
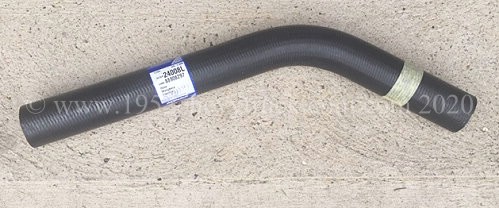
Since this water neck has a 45 degree outlet, a hose with a 45 degree moulded bend is also needed.
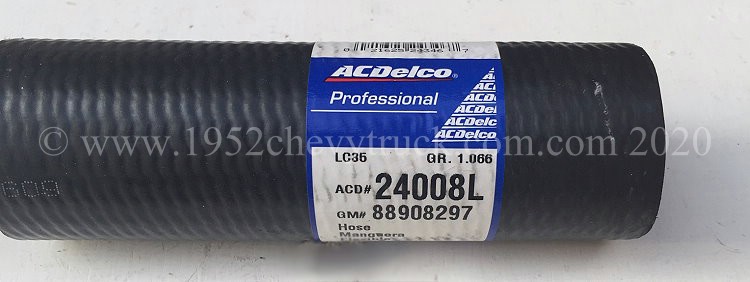
The ACDelco 88908297 radiator hose is ideal. It is 20” long and has a 45 degree bend. It can be trimmed to fit.
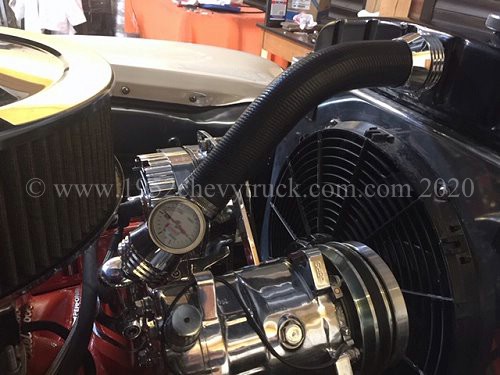
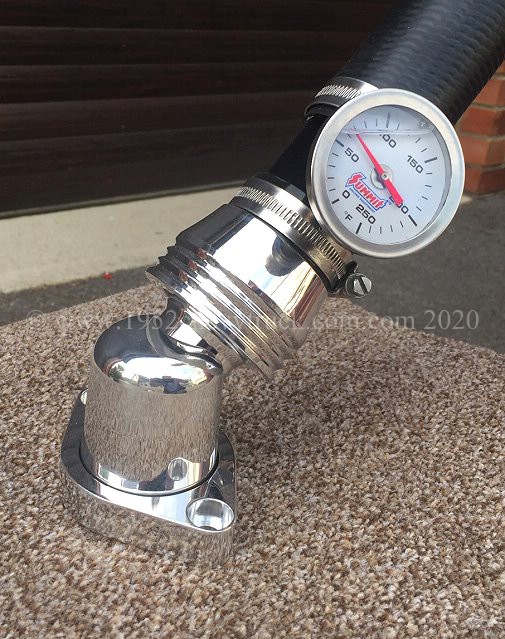
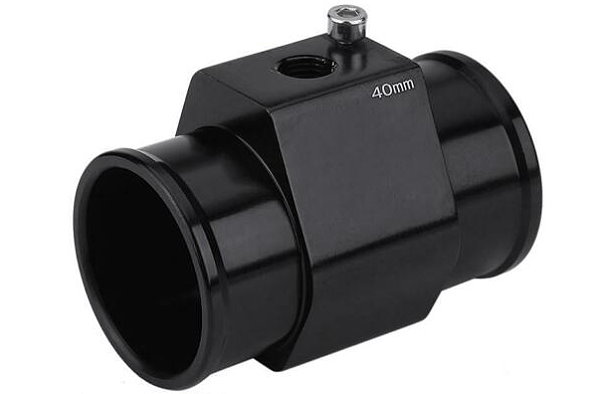
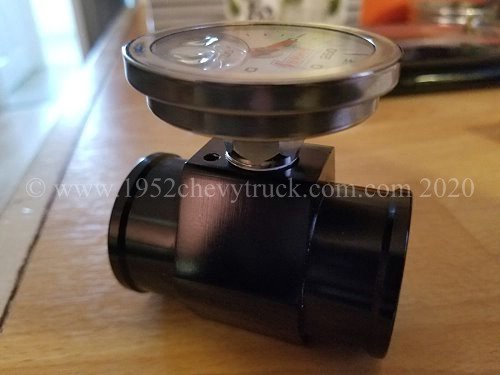
Since there was a need to fit a useful and accurate direct temperature gauge in the top hose (since the outlets in
the inlet manifold were unavailable due to lack of clearance) a temperature sensor hose adapter was purchased.
This adapter is black aluminium and comes with a 1/8NPT sensor outlet. The Summit direct temperature gauge needs
a 3/8NPT outlet and so the adapter was drilled and tapped. These adapters have a strange hose size description
and you have to buy a 40mm adapter to fit a 38mm hose. A short length (60mm long) of Ash wire reinforced silicone
hose was fitted between the water neck and the adapter (but you could just use an off-cut from the GM hose).

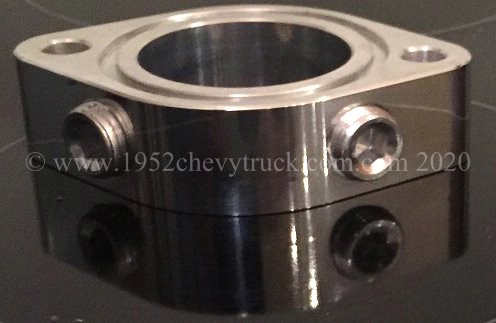
From a trial fit it was clear the GM hose assembly did not exactly align with the waterneck outlet. The water neck
needed raising a little to correctly align it with the rest of the hose assembly. A “Meziere 63433” 1” aluminium
thermostat spacer was purchased and fitted in-between the inlet manifold and the water neck. The Meziere spacer
was not polished to the standard of the BS water neck, so it was polished with “Mothers Aluminium Polish” until
it was as good as the BS water neck. Shown below is the spacer after polishing.
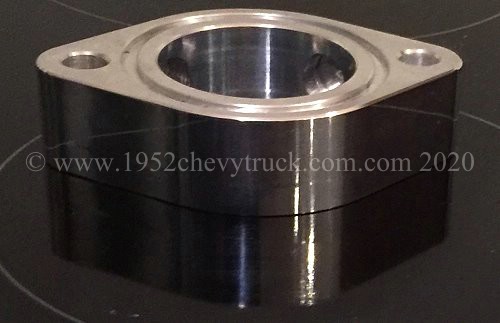
Two Meziere 37812, 3/8NPT Aluminium plugs were needed to plug the two 3/8NPT holes in the spacer. PTFE tape was used to
seal the plugs and also to protect against “aluminium thread locking”. Everything then lined up, fitted perfectly and looked great.
Most importantly there were no leaks and there was no stress on the ACDelco hose as everything lined up. The forces involved in
trying to straighten up the hose cause the stress and the angle of the hose at the inlet is not perpendicular (at right angles)
to the face of the radiator. All of this leads to leaks when the temperature and pressure of the coolant rises.
Stress leaks can be caused by pipes which are not an ideal fit or shape. Trying to get a bend into a reinforced
straight pipe can put considerable stress at the ends at the points of connection, particularly at the radiator inlet.
Shown below is a straight wire reinforced hose with a forced 45 degree bend which can cause stress leaks at the radiator end.
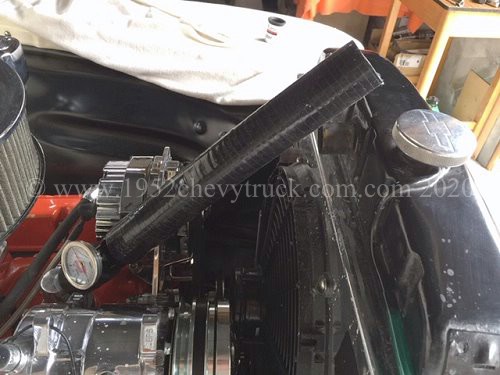
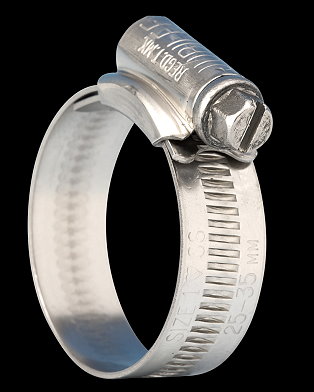
Finally it was important to add to the already very nice appearance with a couple of Billet Specialities 67825 hose end
clips. These polished end pieces look great and hide the integrated hose clips. The 2 hose connections on the
temperature gauge adapter also needed clips and here genuine original stainless steel “Jubilee 1MSS” 32-45mm clips
were used. The clips were rotated to a position which allowed the tightening screws to have easy screw driver
access. Shown below is the complete assembled top hose and also of it fitted to the waterneck. The hose is
moulded at 45 degrees and so everything lines up and nothing is under stress which could result in stress leaks.

Parts list and suppliers.
(Please note, some items shown in the picture below were not for the top hose project).
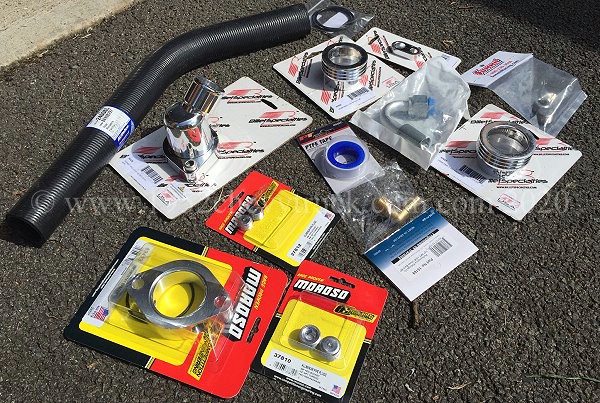
The ACDelco hose come from Summit Racing but is widely available. Also from RockAuto.
The Ash wire reinforced hose came from eBay.
The temperature sensor adapter came from Amazon but comes with a 1/8 NPT outlet (for the sensor).
This was drilled and tapped to 3/8NPT for the Summit Racing temperature gauge.
2 stainless steel "Jubilee" 38mm (32-45mm) 1MSS hose clips from “Zoro” or “Rapid Electronics”.
The Gates rubber shim came from Amazon.com Also from Rockauto.
The Meziere 1” spacer, Meziere plugs, Billet Specialities water neck and BS hose ends came from Summit Racing.
Prices.
• Billet Specialities 90420 water neck $78 (Ł63)
• Meziere 63433 water neck spacer $36 (Ł29)
• Two Meziere 37812 3/8” NPT stoppers for spacer $10 (Ł8 per pair)
• Temperature sensor adapter Ł5 ($6)
• 2 Billet Specialities 67825 hose end clips $22 (Ł18) each
• 2 stainless steel "Jubilee" 1MSS hose clips Ł3 ($4) each.
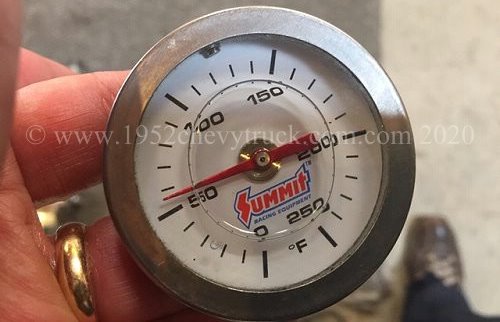
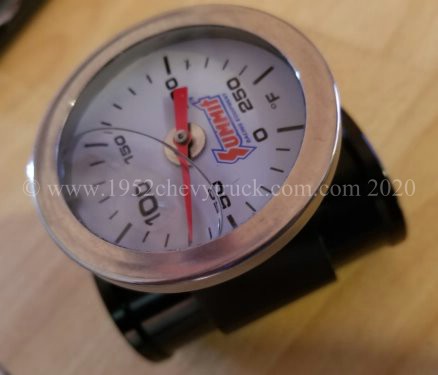
• Summit Racing SUM-350120 direct temperature gauge $32 (Ł26)
• "Ash" wired silicone hose Ł30 ($37) per metre (optional).
• ACDelco 24008L (88908297) radiator hose $14.99 (Ł11)
• Gates 26390 Hose Reducer 1,1/2” to 1,1/4” rubber shim $14 (Ł11)
Total price.
If you used an off-cut from the ACDelco hose rather than buying a 1m length of Ash hose, the total cost of this
complete top hose assembly (including water neck, spacer and temperature gauge) would be Ł195 ($238).
Note - You also need 2 x 2" bolts to hold the water neck and spacer into the thermostat manifold outlet.
I already had a couple of bolts but this would probably bring the total cost to about Ł200.00 or $244.00
About 50% of that total cost was due to the new waterneck and spacer rather than the actual hose assembly.
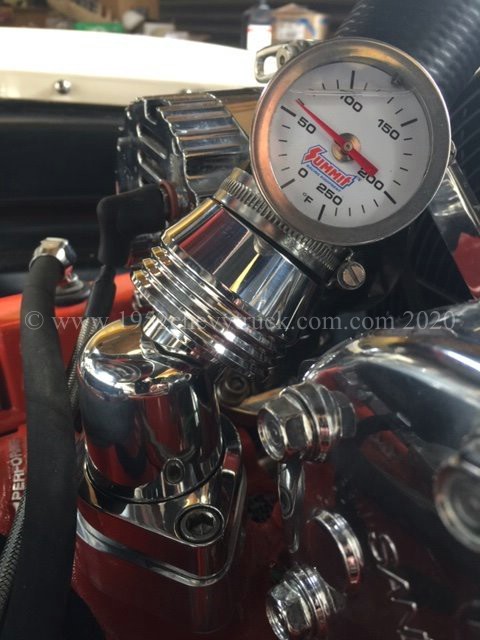
Summit Direct Temperature Gauge Position.
It should be noted that the position for the temperature gauge is above the thermostat. That means it
will only accurately show the correct temperatures when the (160 degree) thermostat is open at higher
temperatures (above 160 degrees). However, the purpose of this gauge is to accurately monitor higher
temperatures to make sure the engine is not running too hot. The normal operating temperature of the
engine would be 180-190 degrees and should preferably be below 200 degrees (210 degrees max).
Therefore this restriction to the gauge’s operating temperature range is not an issue.
When I drive somewhere, and then lift the hood to check the accurate direct gauge temperature,
it usually sits on the 180 degrees mark and that is what I like to see.
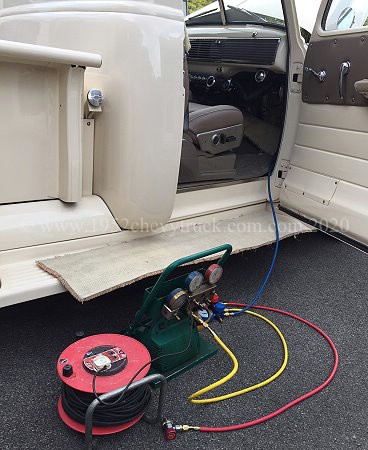
June 2020. Air conditioning pipes connected and gassed up.
The air conditioning pipes were hand polished with "Mothers Aluminium
Polish". Left below shows before and right below shows after.
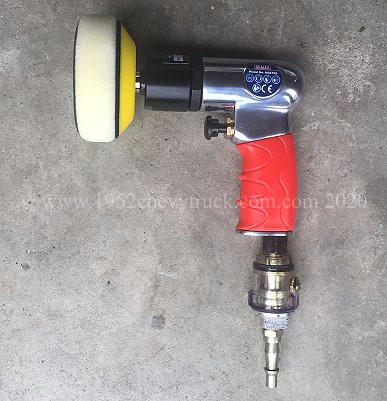
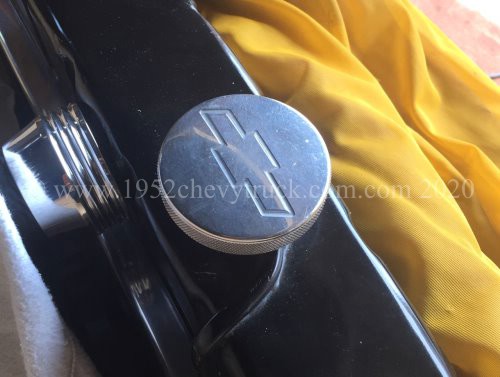
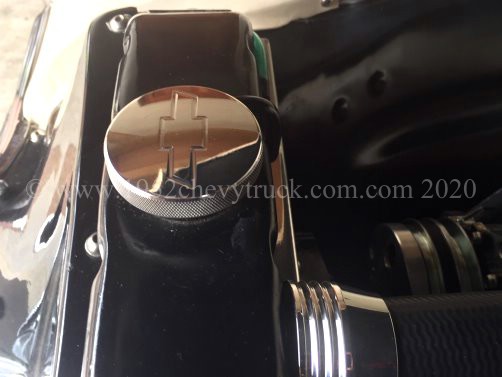
Once again "Mothers Aluminium Polish" was used (see below) to polish the radiator cap.
This aluminium radiator cap was purchased a few years ago and it has not deteriorated. It has always been a dull colour.
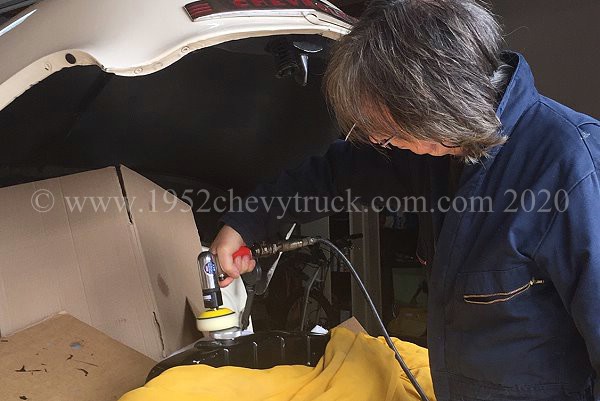
Most if not all companies do not polish aluminium to the high standards of "Billet Specialities". A new Sealey Model G5A722
air tool was purchased from ebay. This tool was on offer for only Ł25.00 ($30.00). Probably the best polishing pads
available also come from ebay. They are from a company called "autobeaming" and cost Ł14.00 ($17) for four. There are
4 grades available. Orange - hard, Yellow - fine, White - soft/fine, Black - super soft. For polishing aluminium the
white pad is ideal. The cap could have been polished using a rotary buffing wheel but then there is a danger it might
be thrown out of your hand. Leaving it on the radiator means it is not going anywhere. Covering the engine and
wearing overalls is recommended as the polish can fly off the tool making a mess. This tool is excellent for polishing
alloy wheels as it can get into most tight corners and curves. Once again before and after pictures are below.
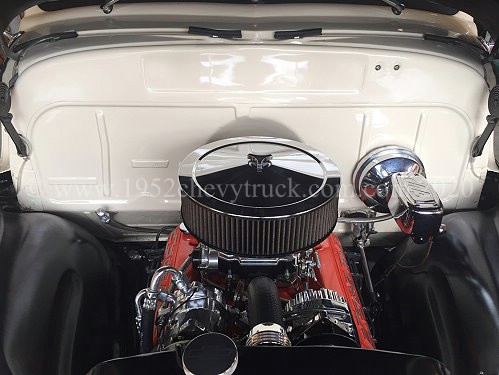
July 2020. "Billet Specialities" polished aluminium coolant recovery bottle to be fitted.
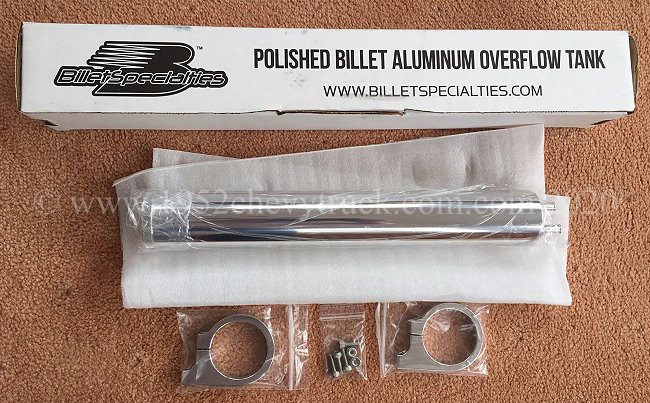
A 13" Billet Specialities coolant recovery bottle has been ordered from Summit Racing. ($105)
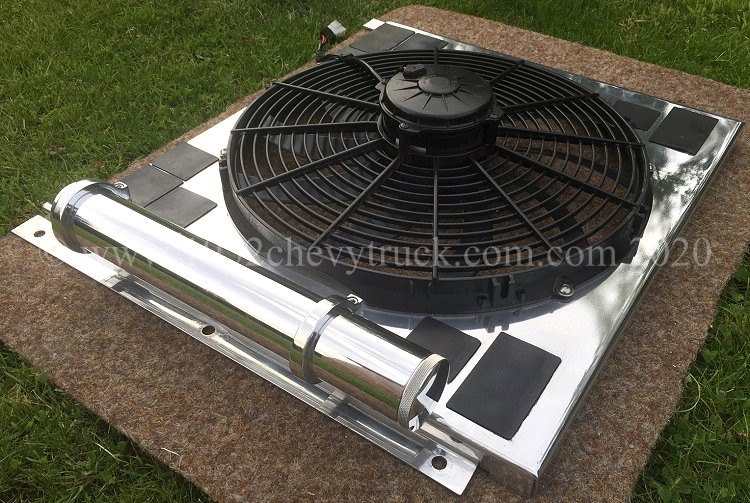
It will be fitted on the right hand side of the radiator up against the right hand fender.
The polished aluminium shroud needs to be removed and drilled to take the recovery bottle brackets.
This work will be carried out from the 11th July 2020
July 2020. The coolant recovery tank.
This page details a very comprehensive cooling package for the 1947-53 (and 54) Chevy truck with V8
and automatic transmission, however, the cooling system is not pressurised. The overflow from the
radiator drains onto the road which means the radiator needs to be regularly checked and toped up.
A pressurised system also needs regularly checking but rarely needs topping up.
The problem with a pressurised system is that there has to be an unsightly expansion tank and hiding
it away is not easy. Some people do hide it inside the fenders with just the filler cap showing.
If the aim is a clean firewall, even an attractive polished aluminium bottle is best avoided. There
is a possible solution. The "Billet specialities" coolant recover tank was chosen. This is aluminium and
stands to the side of the radiator in an acceptable position and it looks good. It is not a 2 port
(inlet and outlet) pressurised tank but it does work quite well. It has one inlet at the bottom
and a blow out valve at the top. What happens is the overflow pipe is connected to the inlet
connection on the bottom of the tank. When the engine temperature rises, the coolant expands
and overflows into the bottom of the tank. When the engine cools, back pressure
(suction) in the top of the radiator pulls the coolant back into the radiator.
It is said to work quite well and is certainly better than discharging coolant onto the road
without recovery.
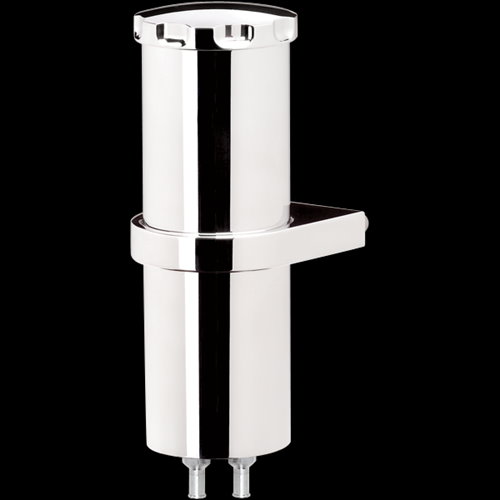
The Billet Specialities coolant recovery tank. This is a company who always produce the highest
quality products made from billet aluminium in the USA and with the highest standards of polishing.
Even the brackets are billet aluminium.
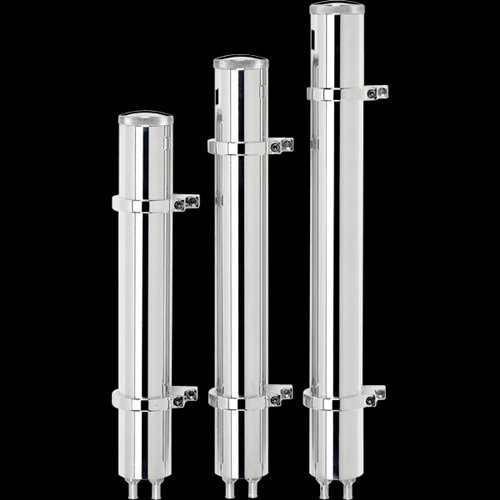
Shown right above - 13,3/8" tall, 2" diameter narrow $105 including the brackets. (Summit Racing)
Shown left above - 8.75" tall, 2.75" diameter $126 including the brackets. (Summit Racing)
Fitting the coolant recovery tank to the shroud.

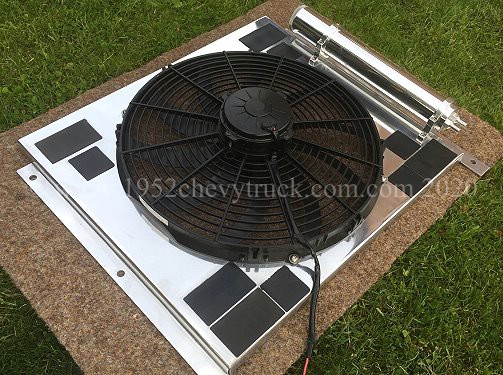
Here you can see how good this polished recovery tank looks on the side of the polished shroud.